How to get 4K 8K or 16K Video With Multiple Cameras

http://www.youtube.com/watch?v=hJEGkC_Ovx0

4k 8k or 16k video

Multiple camera setup for 4k 8k or 16k video.

Ultra High, Super High and Crazy High Definition Video

Creating 4k, or 8k, or even, 16k video, with multiple camera’s.

(Transcript) Lets start off with achieving 4k, with 4 simple HD camera’s.
You can achieve this with any HD camera, but, preferably, all the camera’s, should be the same, with the same settings, and lens.

You would need a rig to adjust its position, as in 2 camera’s above and 2 below.
And you could easily create, a simple rig out of wood or metal.

Lets use the example, with a DSLR, as our setup.
You should use a zoom lens, as apposed to a fixed lens on all 4 camera’s.

Draw up a large 16 by 9 aspect ratio onto a wall, using electrical tape

The mathematics, for achieving a 16 by 9 aspect ratio, onto any size, is as follows;

Starting with width. If you know your width, then,

Multiply your width by 9, then divide the answer by 16.

Example of how a 1920 by 10 80 is a 16 by 9 aspect ratio.

1920 multiplied by 9 equals 17280.
17280 divided by 16 equals 10 80

or,

Starting with Height. If you know your height, then,
Divide your height by 9, then multiplied by 16

Example,

10 80 divided by 9 equals 120.
120 multiplied by 16 = 1920.

You could use this formula for any size at all.

Now, once you have your large 16 by 9 size, you need to divide it into 4 equal parts. Make sure the measurements are exact to the millimeter.

Zoom in your camera, until the first upper left corner, fills the frame exactly to the millimeter, then lock off the camera. You could use the canon’s zoom view button to get precise positioning.

Get the next camera, and zoom into the upper right corner, until it fills the frame to the millimeter. Then repeat the process for the bottom 2 cameras, and lock it off. Now you have 4 camera’s locked off, on 4 different positions, on a 16 by 9 frame.

Record your footage and make sure to have a sync point, so you could sync all the cameras together in the editing room. We will use final cut pro x to demonstrate how to stitch your footage together.

Select new project and use the 4k setup.

Now lay down your footage on top of one another, as layers corresponding to their correct positions, on the 4K project timeline. Then in the inspector window, make sure the spacial conform window, is set to none for each footage.

Now you can-export your footage, as a master file, and have 4K video resolution.

All created from a simple rig, with 4 HD camera’s.

You could effectively do this, with four 4K camera’s as well, to achieve 8K resolution video. And 6K camera’s to achieve 12K video.

If you could get your hands, on four 8K camera’s, then you could achieve 16K resolution video.

Or, you could build a special rig to accommodate much more camera’s and achieve even higher resolutions than 16K.

Let us know your thoughts, we’d love to hear them.

Thanks for watching,
We’ll see you next time


Music: Babylon - Disco Ultralounge by Kevin MacLeod is licensed under a Creative Commons Attribution license (https://creativecommons.org/license

A great way of achieving 4k 8k or 16k video.


Other Links

– The Wedding Of Scott & Jordan

Highlights Version ↓

http://vimeo.com/157835766


Full Length Version ↓

http://vimeo.com/157915305


Wedding Video showcasing the full length and highlights versions

Scott and Jordan, a delightful couple from Melbourne, decided to have a beach wedding at the beautiful West Beach Bathers Pavilion in St Kilda.

After months of preparations, the long anticipated day of the wedding had finally arrived. The guests started arriving around 4:30pm and not long after Scott arrived with his groomsmen at the venue and made his way down to meet some of his family and friends.

At 5pm all the guests had arrived. Some took their seats, while others decided to stand, waiting for Jordan’s entrance. It was a beautiful day perfect for a beach wedding.

Jordan arrived just after 5pm in a Blue VW Kombi van together with her family and her bridesmaids, and made her way to the waiting room. The celebrant, a close friend of the couple who traveled from interstate, began the proceedings, by inviting all the guests to take up any vacant seats.

The excitement started to build when the music began to play, the guests attention was now locked to the bridesmaids walking down the aisle, and Scott didn’t seem nervous in the slightest. He seemed quite comfortable being there joking with his groomsmen while the bridesmaids were walking down the aisle.

Now Jordan was making her way down the aisle with her father by her side. Jordan’s father Michael seemed to be filled with pride and joy for his little girl, now all grown up and looking so beautiful in her wedding dress, walking down the aisle. He handed her over to Scott with an approval handshake and some pleasantries.

Jordan stood by Scott’s side proud and occasionally joking and laughing. But got a little emotional for what her brother had to say for the reading. Scott’s sister also had some lovely things to say in her reading, and both the couple appreciated those lovely words.

They  committed their vows to each other, and when Jordan said in her vowels that Scott is perfect even on the rare occasion he would make a mistake, everyone broke out into laughter. Then they sealed it with a kiss, a smile, and cheers. Finally Husband and Wife. They signed the marriage certificate and made their way with everyone congratulating them. Movie Scene Productions was there to capture all of their special moments with family, friends.

A perfect day for a perfect couple, sun was shining, beaming on the lovely couple enabling them to enjoy their wonderful day at the beach and the general public seemed to take interest in what was going on near by.

The lovely couple together with their bridal party returned to the VW kombi van for a short trip down the road to South Melbourne’s Kerferd rd pier for their wedding photographs.

At about 6pm the MC introduced the bridal party and then the Bride and Groom. They broke into a dance routine and made their way to the bridal table.

The night was filled with lots of laughs, plenty of beer and drinks, tasty food, great music, belly laughter and happy tears, everyone was having a wonderful time for the beautiful couple.

The night ended with all the guests circling Scott & Jordan while they said their goodbyes to everyone. One last dance for the newlyweds and that’s when Scott did a break-dance and grabbed Jordan and lifted her up and away they went.

We wish them a very happy and long marriage together.


Scott & Jordan

Scott & Jordan


– PHD Toneshifterz Free Hoodie Party 2015

PHD Toneshifterz Free Hoodie Party 2015


http://vimeo.com/127466559

PHD-2015-Teaser2

PHD-2015-Teaser2

14 Djs Over 2 Rooms
Featuring Toneshifterz

Friday 15th May
@The Bottom End
579 Little Collins Street Melbourne


Others

– Shooting in 4K. What does it really mean.

Shooting in 4K

Simply put we are going back to our roots when film had the same high level pixel count. It has taken video many decades to catch up and now it has finally done it.  It even looks like it might surpass the resolution of film in the near future as there is already talk of 8K and 16K not too far in the horizon. There are some cameras now shooting in 4K, 5K  and 6K like the RED Cameras. With the 6K RED DRAGON sensor, you can capture over 9x more pixels than HD.


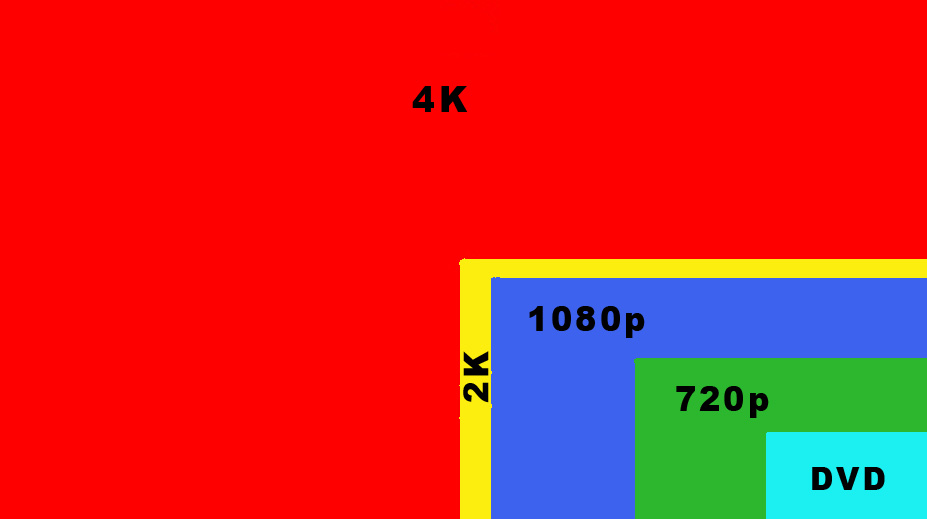
4K is 4 times the resolution of 1080p HD and nearly ten times the resolution of DVD.

The video images out of 4K is breathtakingly jaw dropping and if a couple decide to have their wedding shot in 4K professionally then the results will be absolutely amazing, plus they will be future proofing their most special day in the highest quality for generations to come.

4K is great news for anyone wanting to print high quality images from still frames. You can choose to film your event without a photographer and have still frames of your choice, printed in high quality.

4K is great news for filmmakers because now if you have a shot you’d like to crop and re-frame in post, with all that extra resolution to play with you now have enormous flexibility.
You can choose to have a single wide shot setup and at times punch in to get close ups, mimicking a two camera setup.

4K is great news for shooting high resolution for green screen keying as it will make your keying process much simpler. With so much more resolution your keying software should have an easier time differentiating the green pixels you want to key from the edges of your subject.

4K is great news if you plan on doing any motion tracking, a more detailed image should help your tracker to stay on the points you’ve defined.

4K is great news for future proofing your work.

Now for the bad news.

Much higher resolution images means much bigger files.

If you’re editing in Final Cut Pro and have to trans-code to ProRes, then your file sizes are going to be enormous. We recommend investing in many fast drives.


Shooting 4K, 8K, or 16K with HD Cameras

Creating 4k, or 8k, or even, 16k video, with multiple camera’s.

(Transcript) Lets start off with achieving 4k, with 4 simple HD camera’s.
You can achieve this with any HD camera, but, preferably, all the camera’s, should be the same, with the same settings, and lens.

You would need a rig to adjust its position, as in 2 camera’s above and 2 below.
You could easily create, a simple rig out of wood or metal.

Lets use the example, with a DSLR, as our setup.
You should use a zoom lens, as apposed to a fixed lens on all 4 camera’s.

Draw up a large 16 by 9 aspect ratio onto a wall, using electrical tape

The mathematics, for achieving a 16 by 9 aspect ratio, onto any size, is as follows;

Starting with width. If you know your width, then,

Multiply your width by 9, then divide the answer by 16.

Example of how a 1920 by 10 80 is a 16 by 9 aspect ratio.

1920 multiplied by 9 equals 17280.
17280 divided by 16 equals 10 80

or,

Starting with Height. If you know your height, then,
Divide your height by 9, then multiplied by 16

Example,

10 80 divided by 9 equals 120.
120 multiplied by 16 = 1920.

You could use this formula for any size at all.

Now, once you have your large 16 by 9 size, you need to divide it into 4 equal parts. Make sure the measurements are exact to the millimeter.

Zoom in your camera, until the first upper left corner, fills the frame exactly to the millimeter, then lock off the camera. You could use the canon’s zoom view button to get precise positioning.

Get the next camera, and zoom into the upper right corner, until it fills the frame to the millimeter. Then repeat the process for the bottom 2 cameras, and lock it off. Now you have 4 camera’s locked off, on 4 different positions, on a 16 by 9 frame.

Record your footage and make sure to have a sync point, so you could sync all the cameras together in the editing room. We will use final cut pro x to demonstrate how to stitch your footage together.

Select new project and use the 4k setup.

Now lay down your footage on top of one another, as layers corresponding to their correct positions, on the 4K project timeline. Then in the inspector window, make sure the spacial conform window, is set to none for each footage.

Now you can-export your footage, as a master file, and have 4K video resolution.

All created from a simple rig, with 4 HD camera’s.

You could effectively do this, with four 4K camera’s as well, to achieve 8K resolution video. And 6K camera’s to achieve 12K video.

If you could get your hands, on four 8K camera’s, then you could achieve 16K resolution video.

Or, you could build a special rig to accommodate much more camera’s and achieve even higher resolutions than 16K.

Let us know your thoughts, we’d love to hear them.